


'/%3E%3C/svg%3E)
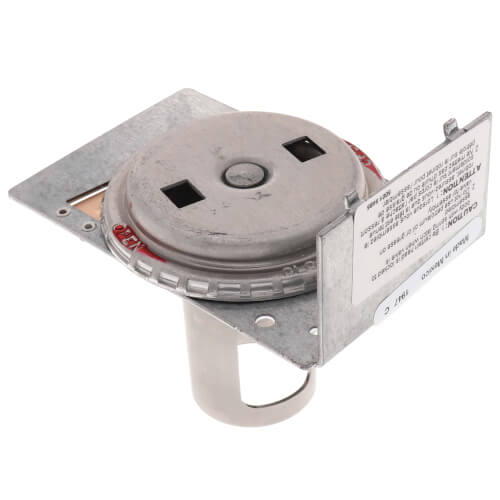
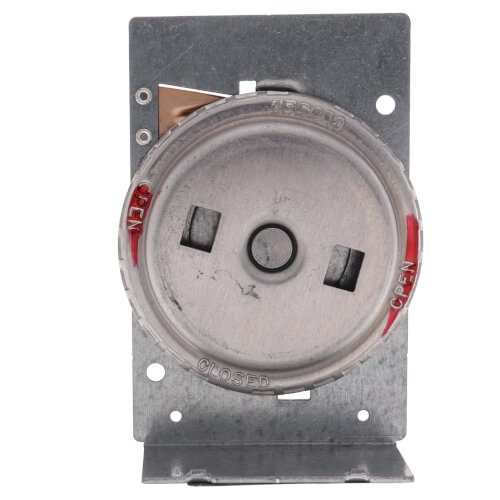
1-1/4" Zone Valve Assembly
MANUALS (2)
Product Highlights
Description
Specs
| Size: | 1-1/4" |
|---|---|
| Application: | Replacement Part |
| Used With: | 1361-104 Valves 1311-104 Valves |

Questions?
You May Also Need
Product Reviews
Most Liked Positive Review
Great Alternative!
Most Liked Negative Review
Beware of leaky seal
I would buy again
I would recommend this product.
Worked
fast service!!!!
Good project
great product
I would buy this product again
I like this part
Easier than trying to replace 0-rings yourself and have leak
Great zone vale base replacement
Product Q&A
4 QuestionsQ: I am ready to install my new 3/4" zone valve assemblies. I am going to use the existing brass valve body instead of sweating new valve bodies on my copper pipe. I took care not to damage them while removing the old valve bores, and have cleaned inside them pretty thoroughly. I do notice that they are still not as silky smooth as brand new valve bodies, though. Before I complete installation, is there any kind of non-corrosive lubricant that I should/could apply to the inside to facilitate proper functioning of the water control valve bores, or will they function fine as is?
Asked by Stephen 14 years ago
Add your answer
Mine worked fine without lubricant, I wouldn't recommend going overboard on cleaning the bore though, definitely not with sandpaper, etc. I think using water as a lubricant for the o-rings helps them to slide in easier, but I wouldnt put anything else on them.
The valve bore is a loose fit, no lubricant is needed. The O-ring is the only place that has a water tight fit. A little water resistant lubricant on the O-ring would facilitate easier installation and longer wear of the O-ring. Gene
Q: I am replacing two of these valve assemblies, and have removed the motor assemblies from each. However, I do not see how these valve assemblies are actually removed from the copper water pipe. I don't want to do any sweating of new pipe and so don't want to damage it; can anyone tell me how to do it?
Asked by Steve 14 years ago
Add your answer
They twist out of the pipe, if you look closely where the base meets the pipe you'll see two tabs that hold the base in, with the water drained from the system you just twist the base and pull it up and out it, may need a little persuasion as most likely they have been in there for a very long time.
press on the copper tab and rotate clockwise and then pull, if the wheel pulls off then grab the stem with a pair of pliers and pull out the stem
Steve, the entire asst pulls straight up out of the 'bore' of the housing soldered in line onthe copper pipe. The round dial will probablly come off. I usually use a vise grip on The spline then pry up on the edges with a flat screw driver equally as possible Around the sides prying on the surface of the vise grip. It may be difficult like pulling a tooth. With patience it will come. Goodluck. Mike, Coachlight Inn Motel.
Simply lift the valve up out of the brass fitting.
Easy job! BE SURE THE PIPES ARE COLD BEFORE DOING THIS! Depress the spring clip and give the valve bracket about a quarter twist the rock the assembly out of the fitting. Be sure you cleean the fitting and grease the O-ring before putting the new valve in using the reverse procedure.
Shut off power to burner,circulator pump and water valve you are servicing Disconnect Wires to the valve after noting their connections in your system--a digital photo is a good idea. Shut off water supply coming into and out of each zone valve. I have mine isolated for each zone for easy replacement. If you do not then drain the system or portion containing the valves you are replacing--otherwise you could have scalding injury or water damage when the valve head is removed. To remove the Valve Head and attached valve assembly push in on the release spring and rotate the valve head until it unlatches. Then lift the valve head out of the valve body Remove the valve assembly from the valve head by removing the two hex screws Position the new valve assembly onto the bottom of the valve head making sure that the yoke in the valve head slips into the two square holes in the manual operating wheel. When power is restored the valve will automatically cycle to the position being called for by the thermostat. Tighten the valve assembly to the valve body with the two hex screws. Now inspect the bore of the valve body installed to the line. Brush out any dirt particles with your finger. Then wipe the bore clean with a soft cloth. Also wipe the valve stem with a soft cloth to remove any dust or grit. Notice which way the valve head needs to be turned to latch it to the valve body. Then insert the valve stem into the valve bore and push downward until the plate of the valve assembly fits snugly against the valve body and then rotate the valve until the head latches. A pinging sound from the release spring tells you that it is secure. Caution: Failure to secure the valve head in the valve body could allow the valve head to separate from the valve body and result in scalding or water damage. Now refill the system, restore power to burner, circulator and water valve after first reconnecting the wires to the valve. Good luck.
Q: Does this part come with installation instructions for replacements? Thanks.
Asked by Pete 14 years ago
Add your answer
Yes it does!
Yes, the part I received had installation instructions with it.
Q: Does this assembly come with the 3/4 inch brass fixture that the tubing sweats into?
Asked by 15 years ago
Add your answer
No, it does not.
It doesn't but if you are just replacing a leaky one be careful not to harm the old fitting. Clean the old brass fitting and reuse it, no sweating required. Be warned the gate or valve can be very difficult to remove. The manual open/closed wheel usually pops off. I then clamp a vise grip to it and pry it out with a screw driver. Good luck.