


'/%3E%3C/svg%3E)
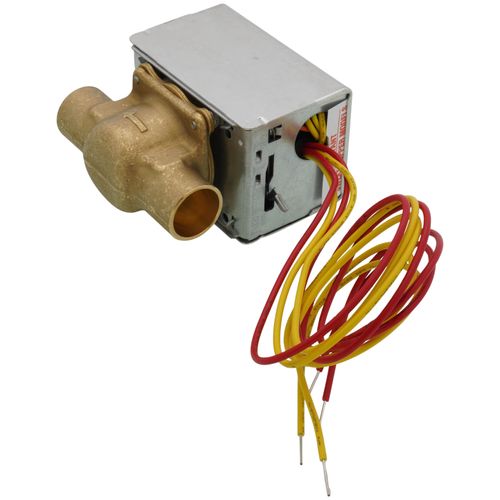
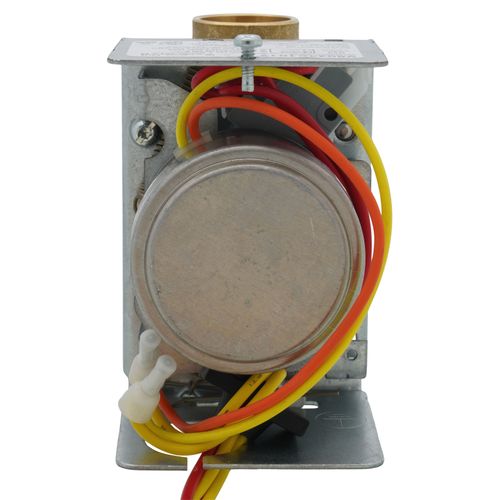
3/4" Sweat Zone Valve (Connection = 18" Leads)
MANUALS (2)
Product Highlights
Description
Features:
- May be installed without disassembling the valve;
- Manual opener (on all models, except straight-through, normally open valves) for valve operation on power failure; valve returns to automatic position when power is restored;
- Complete powerhead may be removed or replaced without breaking plumbing line connections or draining the system;
- Compact construction for easy installation;
- Approvals of Underwriters Laboratories Inc (UL Component Listed: File MH11826 Vol. 1)
- Actuator motor may be replaced without removing the valve body or draining the system
- Hydronic Control. Use this valve in closed loop hydronic systems that do not contain dissolved oxygen in system water, such as fresh water from frequent source of makeup water.
- Valve designed for cycling (not constantly powered on) applications
- Pipe Size (DN): DN20
- Fluid Temperature Range: 50 F to 200 F
- Electrical Connections: 18" leads
- Power Consumption: 7.7 VA
- Nominal Timing: 15 sec
- Valve Action: Spring return to close
- Dimensions: 4" high x 3-1/2" wide x 2-3/8" deep
- Auxiliary End Switch: SPST
- End Switch Rating: 50 VA pilot duty @ 24 V
- Static Pressure (psi): 125 psi
- Materials (Body): Brass
- Materials (Stem): Stainless Steel
- Materials (Ball Plug): Buna-N (NBR) Rubber Ball
- Materials (Packing O-rings): EPDM O-rings
- Voltage: 24V
- Manual Opener: Yes
- Tradeline Value: Tradeline
Specs
| Application: | Zoning |
|---|---|
| Size: | 3/4" |
| Connection Type: | Sweat |
| Voltage: | 24V |
| Body Pattern: | 2-Way |
| Width (Inches): | 3-1/2" |
| End Switch: | Yes |
| Height: | 4" |
| Material: | Brass |
| Amperage: | 0.3 |
| Position: | Normally Closed |
| Depth (Inches): | 2-3/8" |
| Max Pressure (PSI): | 300 |
| Flow Capacity (Cv): | 3.5 |
| Wiring: | 18" Leads |
| Hertz: | 59 |
| Max Ambient Temp (°F): | 125°F |
| Max Close-Off PSI: | 20 psi |
| Max Temp (F): | 200°F |
| Temperature Range (F): | 50°F - 200°F |
| Min Temp (F): | 50°F |

Questions?
Compare Similar Products
You May Also Need
3 Replacement Parts

Need help finding a replacement part?
Product Reviews
Most Liked Positive Review
Exactly what I needed but......
Most Liked Negative Review
These are a double edged sword in my opinion
I would buy this product again!
OEM HONEYWELL
Good product
Things you should know before you buy
Great products
I would buy them again
Great product!
Good Quality Products, Shipped Quickly
Exactly what I needed
Excellent overall
Product Q&A
32 QuestionsQ: Can this zone valve be used in a non-oxygen barrier radiant heating system?
Asked by norcal 11 years ago
Add your answer
yes, but you should not use non-oxygen barrier pex in a heating system
Q: Hi i currently have v8043g1018 valve. Can i use this valve instead to replace the powerhead on existing g valve?
Asked by Jas 11 years ago
Add your answer
I have several of these in my heating system at home. After some research, I'm not able to figure out what the difference is between the V8043G1018 and the V8043E1012 listed at SupplyHouse.com -- both seem to be 3/4" sweat with 18" leads and 24VAC operator. Honeywell literature shows how to upgrade the 1000-series to the new snazzy 5000-series powerhead, so you should be able to switch the 1000-series powerheads with no problems at all. In case your motor is burned out, I did find in some forums that the motor itself is available as a separate part, and is only held in place by one screw and a tab. I didn't see the part number for it though, but did see where some people said it's usually cheaper to buy the whole valve assembly and just use the powerhead, as you plan to do. Good luck & best regards, -Dan Meis
Q: i have the 8043e1012 valve, when it closes, there's a banging in the hot water lines in the house. can a spring be removed to dampen the vibration. i put the pump to low from medium and it did help, but not by much.
Asked by charlie 12 years ago
Add your answer
You have air in your system. The zone valve has nothing to do with your problem. The cause could be a couple things IMO. I asume since we're in the middle of our heating season, your boiler has been working hard to maintain heat. This is the fix I have used to eliminate the banging in a HWBB system while the system is in use with sucess. A word of caution first; system water is usually 180 degrees or greater, boiling water is 212, so always be careful. Also, be prepared when your interacting with the system, things like supply valves will almost always freeze open, so before you start, read the other fix, and check the supply shut off valve. If needed free that up first, you may need it. I'll talk about that issue later in this post. 1. replace the air bleeder located on the return side close to the boiler, usually above the expansion tank, if it has been on the system for a while it becomes suspect. 2. You need to evacuate the air slug in the loop that is banging. The easiest way I found during the heat season, was to prepare a hose that will supply warm water, (never cold, that will crack the cast iron heat exchanger), to introduce water at a decent pressure, to move the air slug out. This method is assuming you have at least one diverter/purge valve in one of the zones. Attach one end of the hose to the drain valve located at the bottom of the boiler. Note: expect that valve to leak after this process, so the cheapest fix is to just screw another valve at the end of that valve. Buy a brass one because of the heat involved at that valve. Attach the other end to the laundry faucet. Remember, you need to purge the air out of the hose first, so as not to introduce more air, then connect it up. 3. attach a hose to the diverter/purge valve into a large bucket. I rigged up a clear two foot end to that hose, which I purchased at Home Depot to allow me to see the air comming out. 4. apply water to system at the same time your opening the diverter to keep system pressure under the blow-off valve pressure, usually its around 30psi. This will move the slug out of the system. You must have only one zone manually open at a time, so you isolate the air slug to that loop, if need be open other zones one at a time keeping all others closed. Close up the system and you should be ready to go. Now, whats causing the air to enter the system. I have found on two seperate times on two different HWBB systems, the culprit is the check/fast fill valve is not operating as designed. This becomes tricky to address because the system is in use. The absolute fix is to replace it. That sometimes is beyond the scope of the weekend warrior home owner. In one fix I got lucky and just opened and closed the fast fill valve several times and it unstuck, you don't even know it wasn't working, allowing water as needed per its designed function. Remember, if you do try this, your introducing more water, thus more pressure in the system, so you need to monitor system pressure. Ideal is 12psi, but mine likes 20psi, never got it lower and thats fine. Now if the check/fast fill valve doesn't close, thats where your supply shut off needs to be operating to avoid a relief valve from blowing off. Otherwise your going to shut the main down. The other one the valve was completely froze and couldn't let needed water into the system, thus causing the air slug. Limped the system till spring to do that changeout. By the way, I slept at a holiday Inn Express last night.
This valve already is designed to close slowly, and I'm quite sure modifying it would not help. Here are a couple things I thought of: -- Perhaps your valve is installed such that the ball is closing to the seat *with* the flow of water, rather than *against* it? -- Along with the above, perhaps your pump is not being turned off by the valve-open switch, so it's running when the valve closes, and the flow of water tends to force the valve closed? I could envision this problem being caused by this scenario. You would want to make sure the pump turns off as soon as the valve begins to close, so no water is flowing when the valve reaches full-closed. That should prevent the water hammering you're hearing. --Dan Meis
This valve already is designed to close slowly, and I'm quite sure modifying it would not help. Here are a couple things I thought of: -- Perhaps your valve is installed such that the ball is closing to the seat *with* the flow of water, rather than *against* it? -- Along with the above, perhaps your pump is not being turned off by the valve-open switch, so it's running when the valve closes, and the flow of water tends to force the valve closed? I could envision this problem being caused by this scenario. You would want to make sure the pump turns off as soon as the valve begins to close, so no water is flowing when the valve reaches full-closed. That should prevent the water hammering you're hearing. --Dan Meis
Source of noise is water hammer caused by the valve closing too fast. Disconnect the short spring on the valve and the water hammer should go away. Common problem with quick closing valves.
The first thing I would check is the expansion tank sizing (diaphragm type I hope), it never surprises me to find one too small because way too many around here I find undersized. When it comes to expansion tanks it MUST BE sized and charge to match system operating pressure. It could be the zone valve is installed against the water flow too, much less likely depending on who installed it.
Q: Can a V8043 E 1012 motorized vale be used instead of a V 8043 F 1036 and what's the difference?
Asked by Bill Briggs 12 years ago
Add your answer
basically the same valve, the E1012 has factory installed leads, the F1036 has an external terminal board, Can be used interchangeably
Yes, you can. Difference is terminal block versus lead wires.You will have to use pieces of wire to make wiring. If replacing old one cut and use wires from the old. Also if replaced valve relatively new version you can replace just head leaving brass seat in place and save time on soldering.
The two are the same except the 8043E uses wires to connect to the thermostat and the 8043F has a screw blocks to connect thermostat wires.
Q: i am installing a HOneywell V8043E1012. It has 2 yellow leads and 2 red leads. Does it matter which red and which yellow that I connect as long as they are the same color? Thank you.
Asked by T 13 years ago
Add your answer
Installation instructions have multiple wiring diagrams depending on how the system control is configured and if this valve is replacing another manufactures' valve. Basically the yellow leads are the power leads for the actuator motor and the red leads are from the end switch and used to control the boiler, pump or other devices in the system.
NO, its an AC voltage system so there is no polarity.
Yes, just connect either yellow wire to a yellow wires and the same for the red.
The 2 yellow leads are usually connected in series with the 24 VAC circuit with the thermostat so that when the thermostat contacts close on a call for heat, the circuit is closed and the 24 VAC operates the motor in the Honeywell zone valve. As the zone valve opens, it also closes a contact switch attached to the 2 red leads. Thus, the two red leads are usually connected to the 2 connections marked "thermostat" in the furnace control box. So what happens is that when the thermostat calls for heat, it supplies power to the zone valve causing it to open and the contact switch to close. The closed contact switch then turns on the furnace and circulator pump. When the thermostat is satisfied, it cut power to the zone valve, causing it to close and the contact switch to open. The open contact switch causes the furnace and circulator pump to shut down.
Not sure if this helps, but I just replaced mine marking each lead and reconnecting them in reverse order. My original installation was wired by a friend in the business. So, all I did was switch out the "head" leaving the zone valve (brass) assy. in place, when the electronic side of the valve failed. Good luck.
No it does not matter it is made for a closed-circuit/loop systems
In most cases It doesn't matter. Control 24VAC voltage generally has no polarity. In addition, if it would matter they would be marked accordingly. There are some rare exceptions of wiring however. This would be If several transformers are used crossing in to the same circuit it is better if AC voltageis are in phase and would not fight one with another. If you have one transformer setup or two transformers setup but totally independent circuits for thermostats (these yelow thwires that thermostats complete) and for boiler control (which these two red wires complete) then you are free to connect any yellows and any reds.
Dosen't matter. If it did matter, they would make the wires diffent colors. Yellow pair is power to make the valve open. Red pair is for an end switch.
There is no polarity to either the red pair or yellow pair. The valve motor accepts 24 VAC on one pair (yellow as I recall) to open it. The other pair (red as I recall) is the end switch, which carries 24 VAC to your circulator pump relay (a "fan center" is often used) to turn the pump on whenever the valve is open. Hope this helps! -Dan
There is no polarity to either the red pair or yellow pair. The valve motor accepts 24 VAC on one pair (yellow as I recall) to open it. The other pair (red as I recall) is the end switch, which carries 24 VAC to your circulator pump relay (a "fan center" is often used) to turn the pump on whenever the valve is open. Hope this helps! -Dan
Q: I currently am using B&G CT24 3/4" zone valves and am considering switching them out for Honeywell or Taco. (I am always having a problem with one of the B&G and am looking for a more reliable replacement.) Is this Honeywell a compatible replacement - and will the existing brass valve work with the Honeywell or does it need to be replace as well? Thanks.
Asked by Bob 13 years ago
Add your answer
The Honeywell zone valves are very reliable and are probably the most widely used valve for hydronic heating system zone control. However, if you're replacing existing B&G CT-24 valves with either the Honeywell or Taco valves, the motor assemblies on each are different and incompatible with each other. Therefore, you'll have to replace the entire unit consisting of the brass valve and motor assembly.
I,m not familiar with the B&G valve. Been using Honeywell for many years, no problems. They use a rolling ball seat that won't jam. Having soft water helps too. Eric
Entire valve (including body) will need to be replaced. Both are 24 vac. Honeywell uses an end switch to activate boiler and pump (if wired that way).
With this valve you will have to replace complete valve assembly. You will have to soder it in place in right dirrection to 3/4 copper pipes. In that regard it completely compartible replacement. Depending on your setup you wire it accordingly preferably with end switch red wires activating boiler T-T terminals. Unless you have extremely old non 24v system, you should not have any problems. It comes with accurate instructions and possible wiring schemes.
I'm sure the Honeywell mechanism is not compatible with the B&G valve - you will need to replace the entire unit. I have worked with Taco, Wirsbo, and Honeywell; and I like Honeywell the best.
Q: I want to install honeywell zone valve V8043E 1012 . My question is.... Do I have to take off the actuator head off the valve assmbly before applying the heat/soldering?? ..( wont I otherwise cause heat damage to the motor , microswitch, wires ,etc.....I dont want to "fry" my new zone valve by installing it wrong)....any tips would be greatly appreciated.. thanx much..
Asked by Doc Bob 13 years ago
Add your answer
Why take the risk - remove the actuator! Place the actuator lever in the locked open position, remove actuator assembly by removing the two bolts using a Torx wrench, pull it off the valve assembly (note the orientationn of the shaft so you when you re-insert the shaft, the ball valve will be in the correct position - common sense helps), unscrew the two bolts that hold the valve assembly and remove the ball valve assembly being careful not to lose or damage the o-ring. Then do the soldering! Reassemble by reversing the process!
This valve ships with a nice instruction sheet in the box, which tells you to simply place the manual control lever in the "open" position before soldering it up. However, if you are really cautious like me, it's super easy to disassemble the mechanism. The cover just pops off, then two screws allow the motor to be removed. Two more screws allow the cover and valve arm & ball to be removed -- note that there's a thin o-ring in between that you'll want to make sure is correctly positioned when re-assembling.
I USUALLY SEPARATE BEFORE SOLDERING, ALWAYS BETTER TO BE SAFE THAN SORRY.
Well, it depends on your soldering skills. Manufacturer recommends just keep the valve in open position (hand lever opened and locked). This will keep rubber ball valve from touching the seat (which is part of the solder body and becomes really hot) Heat transfer to the mechanism itself is unsignificant due to the fact that it seats on only two stays and attached to them with two screws. If you in doubt, you can remove this head by removing these two screws. However, installing head back in the right position sometimes a bit tricky. If your valve same honeywell valve and is more or less modern, you can also conciser removing old head and replacing with new head. Honeywell changed design for easy replacement several years ago. Therefore since then heads are interchangeable. To see if they are you have to remove covers from new and old valve and compare. In any case better to have new valve ready and make decision after inspection.
I just set the valve to "open" befor soldering so the ball isn't touching the seat which is what will be getting hot
Are you replacing the same zone valve V80443E 1012. then the answer is no. You can just swap out the control head into the existing valve already installed in your system
Q: I have an old Honeywell z-21-13 a1993 boiler. The zone valve for this unit is v8043e 1012. The boiler services two zones. One zone works fine, but the second zone does not deliver heat even when I manually open the valve and turn the thermostat up (10 degrees higher than ambient temperature.) The pump is working, evidenced by zone one heating up. The thermostat works because when I turn it on, the water is heated and the pump appears to turn on. Any suggestions?
Asked by Joe B. 13 years ago
Add your answer
Even though you are moving the manual lever to open the valve, the valve itself may not be moving. As I recall there is a spring link between the gears so that even if they are moving the valve can remain closed. Also the small gear on the drive motor can break off or strip easily, then the valve isn't opened by the thermostat. You can remove the valve head from the soldered on connection with two screw at the rear of the head. You'll have to drain the system unless your installation has shut off valves for that zone. Be ready to catch some water! Now you can see what the valve is really doing. 20 years is a long life for these valves. If you need to replace it, you most likely can use the existing, soldered in connection.
If hot water is available for zone 1 you must have an obstruction or air in zone 2. If you did any repairs to the heating system recently then it's air bound. Go to the highest point in the zone and bleed the air after the circulator turns on. Make sure make up water is working and available. Good luck. Tommy
AIR LOCK IN THE ZONE. shut down other zone. activate manual in line gate valve on nonworking zone and bleed the line.
Most likely, you have some air in the piping of the zone that's not heating up that's preventing the hot water from circulating. You may need to replace the automatic air vent valve on that zone, and then flush and refill both zones with fresh water.
Each zone is controlled by its own thermostat. All zones are in parallel and anyone of them should be able to control the furnace ignition and pump. Thus, they are OR'ed together - in a two zone system, EITHER the Zone 1 OR Zone 2 can control the ignition and pump. Each thermostat controls the operation of its own motorized valve/furnace control switch. When a thermostat triggers a valve to operate, two things must happen : a 24-volt motor physically opens the valve AND when fully-opened, closes a micro-switch that activates the furnace control discussed above (i.e . furnace ignition and pump). The valve movement also opens the normally closed water valve the returns water from the zone. Several things can prevent a zone from working properly: 1. The thermostat may be disconnected; 2. The 24-volt supply may not be providing sufficient voltage two open the valve AND trigger the microswitch at the extreme open-position; 3. The motor in the valve may be too weak (or non-functional) to move the valve especially if the valve is jammed or sluggish because of calcium residue buildup. This can be exasperated by high resistance in the thermostat connection to the valve - perhaps due to extremely long runs of high-gadge wires. If the valve can't open (and no other zones are turned-on) the furnace will not be "on" or the water won't flow through the zone. Thus - no heat in the zone. 4. The valve is otherwise malfunctioning.
Q: This valve is typically powered-open with 24VAC. Will this motor also work with a 24VDC system?
Asked by K 13 years ago
Add your answer
No, this valve requires 24 VAC, which is the typical control voltage used in a hydronic heating system.
I DOUBT THAT IT WILL WORK , BUT WHERE WOULD ONE GET 24VDC ON ANY TYPICAL HYDRONIC HEATING SYSTEM ?
typically a/c valves can not be powered by dc current you will need a dc valve or swap out your dc "transformer" for a/c transformer
no
Q: The installer put this valve in my open loop hydronic cooling system. It has been about 2 years now and leaking through, what valve do you recomend I change to?
Asked by Joe 14 years ago
Add your answer
This zone valve is designed for use only in closed-loop systems. You might want to consider one of Taco's "geothermal" zone valves, which can be used in open-loop systems.
Hi: The only place where the leak may occur at the rubber ball stem which is attached to the motor and the O ring that sit between the motor plate and housing plate. Honey well zone valve last for long time. Buy a new one and remove the old motor assembly and install onto the housing piece which is soldered to the pipe. No need to remove the housing. I hope this help John Mui
If their is no shout off valve, you will have to drain system. replace with flair zone valve , if you are real careful cutting out old valve you will not need to add pipe. tako is a very good valve, you can replace the gate without removing valve.
This valve is the preferred valve and I recommend replacing with the same. Honeywell makes a great product even though yours only lasted two years.
why not just replace it with the same valve? The only other option is to go to a circulated system. Then you would have to use circulators and switching controls. not sure would be cost effective.